
Imagine this: you’re in your workshop, a symphony of sawdust and the whirring of machinery filling the air. Your hands dance over the wood as you craft a masterpiece, guided by the precision of a tool that has become an extension of your very being. That tool, my friend, is the Craftsman radial arm saw. A powerhouse of potential, this machine can cut through virtually any material with ease, but harnessing its power requires a thorough understanding.

Image: auctions.ejsauction.com
This guide serves as your compass, navigating you through the intricacies of the Craftsman radial arm saw, from its basic functions to advanced techniques. Whether you’re a seasoned woodworker or a curious beginner, this comprehensive manual will empower you to unlock the true potential of this extraordinary tool.
A Journey Through Time: The History of the Radial Arm Saw
The tale of the radial arm saw begins in 1924 with the invention of the “radial saw” by C.H. Depew. This revolutionary design, with its rotating arm and powerful motor, democratized woodworking, making precision cuts accessible to both amateurs and professionals. By the mid-20th century, Craftsman, a name synonymous with reliability and quality, had embraced the radial arm saw, solidifying its place in workshops worldwide.
Understanding the Anatomy of the Beast
Before embarking on your journey to mastery, it’s essential to grasp the fundamental components of the Craftsman radial arm saw:
- The Arm: The heart of the machine, the arm gracefully swings across the table, carrying the saw blade with surgical precision.
- The Motor: A powerful engine that propels the blade, cutting through wood with ease.
- The Saw Blade: The sharp edge that does the work, available in various sizes and tooth configurations depending on your cutting needs.
- The Table: A sturdy surface that holds the wood in place during cutting, ensuring stability and accuracy.
- The Fence: A guide for precise cuts, allowing you to achieve straight lines, angles, and intricate shapes.
- The Depth Adjustment Mechanism: Controls the depth of the cut, ensuring you cut only as deeply as you need.
- The Motor Housing: Protects the motor and provides a sturdy handle for moving the saw.
Setting the Stage: Initial Setup and Safety Precautions
Before diving into the world of cutting, it’s imperative to establish a secure and safe workspace.
- Securely Mount the Saw: Choose a sturdy workbench or platform for your saw and ensure it’s level and stable.
- Choose the Right Blades: Select blades suitable for the materials you intend to cut. Ensure the blade is sharp and free of defects.
- Set Proper Blade Height: Always maintain the proper blade height for the task at hand. This prevents kickbacks and ensures efficient cutting.
- Don Personal Protective Gear: Never operate the saw without safety glasses, hearing protection, and work gloves.
- Clear the Workspace: Ensure a clutter-free zone around the saw, removing any loose objects that could interfere with operation.
Now that your saw is set up and safety is prioritized, let’s delve into the mechanics of precise cuts.
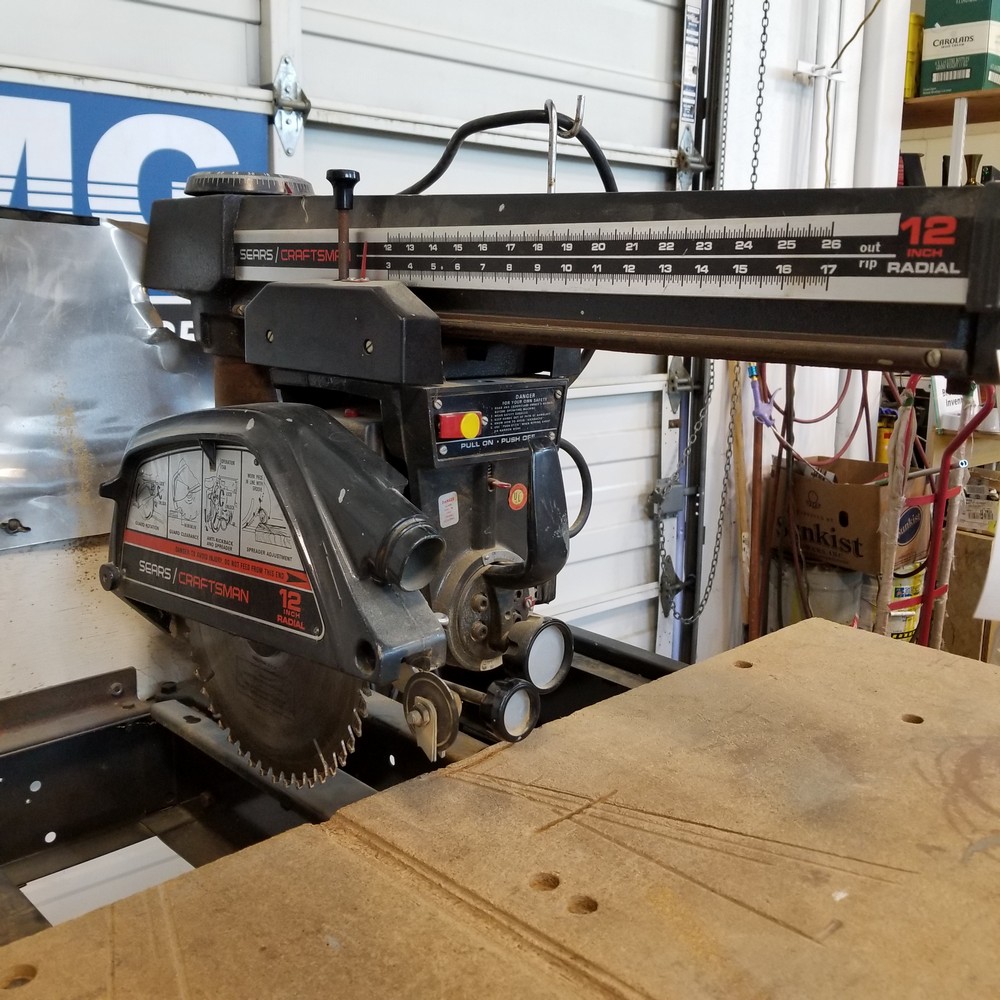
Image: www.elevate.in
Mastering the Art of Cutting: Techniques and Tips
The Craftsman radial arm saw is a versatile tool capable of achieving a myriad of cuts, from simple crosscuts to intricate bevels. Here’s a breakdown of key cutting techniques:
-
Crosscutting: Making cuts perpendicular to the grain of the wood.
- Procedure: Align the blade vertically, set the depth, and position the wood against the fence.
- Tips: Use a push stick to guide the wood into the blade and maintain a firm grip.
-
Ripping: Cutting along the grain of the wood, often used to create precise widths.
- Procedure: Align the blade parallel to the fence, set the depth, and slowly slide the wood against the fence.
- Tips: Adjust the fence to achieve the desired width, and be careful of the kickback potential.
-
Mitering: Making angled cuts, essential for creating frames, picture moldings, and more.
- Procedure: Adjust the bevel scale on the saw to your desired angle, and position the wood to ensure the cut falls accurately.
- Tips: Use a protractor or angle finder to precisely set the angle for accuracy.
-
Compound Mitering: Combining bevels and miters for intricate cuts, often used for cornice molding or furniture joints.
- Procedure: Adjust both the bevel scale and the miter gauge to achieve the desired angle combinations.
- Tips: Take your time setting angles carefully for precise results.
-
Dado Cuts: Creating grooves or recesses, essential for joinery, dado rails, and shelves.
- Procedure: Use a dado head or stack of blade sets for dado cutting.
- Tips: Use a depth gauge to control the depth of the cut and ensure it’s uniform throughout.
Beyond the Basics: Advanced Cutting Techniques and Projects
As your confidence grows, so too will your desire to tackle more complex projects. Here are some advanced cutting techniques and project ideas to ignite your creativity:
-
Tenoning: Creating sturdy joints for furniture and frames, a hallmark of woodworking.
- Procedure: Use the saw to cut precise tenons, and ensure they fit perfectly in the corresponding mortise.
- Tips: Use a tenon jig for precise cuts and consistent results.
-
Beveling: Creating angled edges on wood for decorative purposes or creating unique design elements.
- Procedure: Adjust the bevel scale on the saw to achieve the desired angle.
- Tips: Use a bevel gauge to set the angle accurately.
-
Rabbet Cuts: Creating grooves along the edge of a board, used to accommodate shelving, trim, or other components.
- Procedure: Adjust the blade height and fence to create the desired groove depth and width.
- Tips: Use a rabbeted jig for consistency and accurate cuts.
Project Ideas:
-
Custom Shelves: Create shelves to fit your exact specifications.
-
Picture Frames: Build customized frames for cherished memories.
-
Simple Furniture: Craft simple chairs, tables, or shelves to enhance your home.
-
Architectural Moldings: Add intricate details to your home decor with precision cuts.
-
Wood Turning Blanks: Create blanks for your wood turning projects.
Expert Insights: Tips for Success from Masters of the Saw
Master woodworkers consistently share these wisdom nuggets:
- Understanding Your Wood: Different wood species have unique characteristics, affecting cutting behavior.
- Invest in Quality: Choose high-quality blades and tools for precision and durability.
- Practice Makes Perfect: Regular practice builds confidence and improves cutting techniques.
- Safety First: Never compromise safety.
- Take Your Time: Patience is essential for accurate cuts.
By implementing these expert tips and harnessing the power of your Craftsman radial arm saw, you can transform your woodworking aspirations into tangible realities.
Craftsman Radial Arm Saw User Manual
A Journey of Skill and Craftsmanship
The Craftsman radial arm saw is more than just a tool; it’s a gateway to unleashing your creativity and bringing your woodworking dreams to life. With this comprehensive guide as your trusted companion, you’ll navigate the intricate world of the Craftsman radial arm saw with confidence.
Whether you’re crafting simple projects or tackling intricate designs, remember that every cut is a step towards becoming a master craftsman. The journey awaits; embrace it and let your woodworking skills soar.
Further Exploration:
- Online Woodworking Communities: Connect with fellow woodworkers and share knowledge.
- Woodworking Books and Magazines: Gain insights from seasoned professionals.
- Woodworking Classes: Expand your skills with formal instruction.
Share Your Triumphs:
We’d love to hear about your woodworking adventures! Share your projects, tips, and experiences with the community. Let’s build a space of collaboration and knowledge sharing, where the art of woodworking thrives.


